Thursday, September 27, 2012

Kit Kat Cake


Today's recipe...Kit Kat Cake! I saw a gorgeous picture of this cake from Recipe Girl, and it was so great looking that I knew I had to make it, I just didn't know what to make it for. I mean, I like cake, but making this whole thing for just my family would be too much. Well, the time has come, because TODAY is my sister's birthday! Okay, so I didn't make it for her real birthday, but I made it for her party. Twelve ten-year-olds gave this cake the thumbs up! I have to agree, it looks pretty impressive, but it's super easy to make!

You start out by baking a recipe for a 9-inch round layer cake. I made my favourite chocolate cake recipe from scratch, but you could make vanilla, or use a boxed mix. Then you cover it in icing like you would a normal cake.


Once your cake is frosted, the fun part begins! You're going to need LOTS of kit kats...
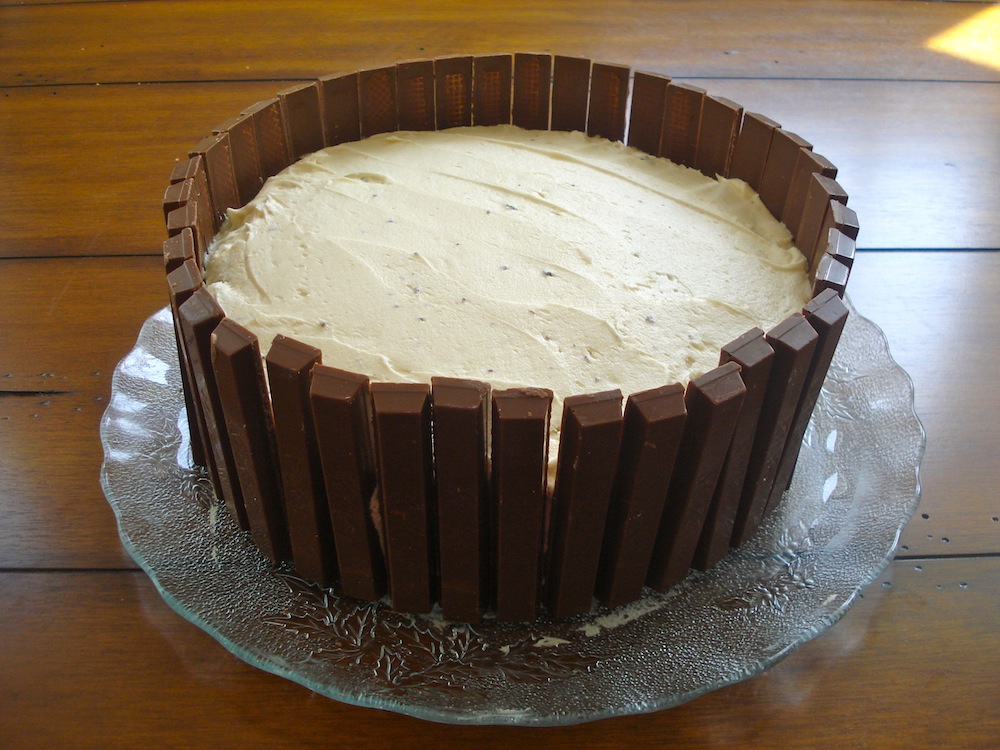

I used eleven in total, but depending on how you space your kit kat sticks, you may need more or less.


Fill 'er up! I used just enough m&ms to cover the top of the cake (so you couldn't see the frosting), but you could pile them up all the way to the top of the kit kats if you wanted!


Then tie a pretty ribbon around the cake, and you're all done! It's so fast and easy, and it looks (and tastes!) fantastic. This is definitely one you'll want to try out!

Kit Kat Cake
Idea from Recipe Girl, chocolate cake from allrecipes
Serves 12-16

For the Cake
  • 1 3/4 cup flour
  • 2 cups white sugar
  • 3/4 cup cocoa powder
  • 1 1/2 tsp. baking soda
  • 1 1/2 tsp. baking powder
  • 1 tsp. salt
  • 2 eggs
  • 1 cup milk
  • 1/2 cup vegetable oil
  • 2 tsp. vanilla extract
  • 1 cup boiling water
For the Icing
  • 1 cup (2 sticks) unsalted butter, softened
  • 3 cups powdered sugar, sifted
  • 1/4 tsp. salt
  • 1 Tbsp. vanilla extract
For Decorating
  • 11 Kit Kat Bars (44 sticks)
  • 1 12.6 oz. bag M&Ms
Preheat oven to 350 degrees.

In a large bowl, combine flour, sugar, cocoa, baking powder, baking soda and salt. Add eggs, milk, oil and vanilla and mix on medium speed of a mixer for about 2 minutes. Add boiling water, and stir well so batter is an even texture. Pour into well-greased 9-inch round pans and bake in preheated oven for 35 minutes. Let cake cool completely

To make icing, beat butter with beaters or in the bowl of a stand mixer for about 2 minutes. Add in the powdered sugar, a little at a time, and beat until combined, about 3 minutes. Add in vanilla and salt, and beat again to incorporate.

Frost cake all over. Arrange Kit Kat wafers along the sides. Pour M&Ms on top, using enough to cover top so icing is not visible. Wrap ribbon around cake and tie with a bow, if desired.


Wednesday, September 19, 2012

What's In My Lunch Box?

Recently, the teenie tiny baker and I got some new lunch boxes! For some people, this would not be very exciting, but we were (ARE!) super excited. Our lunch boxes are from Planetbox, and they're a great idea! They're made of stainless steel, so they're great for the environment, not to mention that they make cute, healthy lunches as well. I make school lunches for myself and my sister every morning, and I've been having so much fun filling up the compartments. After a few days of making these fun lunches, I thought that I should take some pictures to share them with you! So, without further adieu, here are our lunches:


This is my sister's lunch. It's packed in the Planetbox Launch, which has three larger compartments. Her lunch includes a hot dog with ketchup, carrots, snap peas, apple slices and teddy crackers.


This is my lunch. It's packed in the Planetbox Rover, which has five compartments, plus a little one in the middle. My lunch today was a cheddar wrap, a salad with balsamic dressing (in the silver container), a plum, a few pistachios and a chocolate chip muffin. It was delicious! 

So there you go! Those were our lunches today. Hope you enjoyed! 

Sunday, September 16, 2012

Chocolate Chip Mini Muffins

I'm going to let you in on a secret. I never use real buttermilk. It's just so annoying when a recipe calls for 1/2 a cup of it or something, because you have to buy an entire carton. Seriously. What am I going to do with the rest? Drink it. I don't think so. And it goes bad quickly, so I usually don't use it up in another recipe in time.


Well, I'm now going to share with you my new favourite cooking tip. You can make your own buttermilk! And it's super simple, using ingredients you probably have on hand. All you have to do is add one tablespoon of white vinegar or lemon juice to a measuring cup, fill the rect (to the one cup line) with milk, let it sit for 5-10 minutes and voila! Buttermilk! It's perfect for recipes where you just need a little bit...recipes like this one!


These chocolate chip muffins are just as delicious as they look. I made them in mini muffin cups, and they fit perfectly inside a lunch box for a little treat. Everyone in my family loved them, and everyone in your's will too!

*Note: If you have some buttermilk in your fridge you're looking to use up, this recipe would be a perfect way to use up one cup of it!

Chocolate Chip Mini Muffins
Adapted from allrecipes
Makes 36-40 mini muffins (or about 12 regular ones)

  • 2 1/4 cups all-purpose flour
  • 1/2 cup white sugar
  • 1 tsp. baking soda
  • 2 tsp. baking powder
  • 1/2 tsp. salt
  • 1/4 cup butter, melted
  • 1 egg, lightly beaten
  • 1 cup buttermilk (or "buttermilk substitute", as shown above)
  • 2 tsp. vanilla extract
  • 1 cup mini chocolate chips
Preheat oven to 375 degrees.

In a large mixing bowl, mix flour, sugar, baking powder, baking soda and salt until combined. In a small bowl, beat the egg, then add melted butter, buttermilk and vanilla, beating until combined. 

Add butter mixture to flour mixture, stirring only until just combined. Fold in chocolate chips.

Drop into mini muffin pan lined with muffin liners. Bake in preheated oven for 11-14 minutes, until toothpick comes out clean.

Thursday, September 13, 2012

Triple Berry Pie

Well, school has been back in session for about a week now, and my life is already so much busier (as you can probably tell with the lack of posts lately - sorry!). The weather has gotten a little bit cooler (although the next few days are supposed to be hot and sunny. No complaints from me - summer's not over yet!) and I'm slowly getting back into my school routine.


Last week, for one last hurrah of summer vacation, I made this berry pie. This pie is great for those days when you don't have enough of one berry to make a full pie, or when your berries are going a bit soft. For me, it was a bit of both. I had some blueberries, some raspberries and some strawberries from the farmers market, and they needed to be eaten up fast.


If you're looking for a great end-of-summer dessert, make this triple berry pie. It's delicious!

Triple Berry Pie
Adapted from food.com
Makes one 9-inch pie
  • 1 recipe for a double-crusted pie crust
  • 4 cups strawberries
  • 2 cups raspberries
  • 1 cup blueberries
  • 1/2 cup white sugar
  • 1/2 cup brown sugar
  • 1/4 cup cornstarch
  • 1/2 tsp. cinnamon
  • 1/4 tsp. salt
Prepare pie dough according to recipe. 

Preheat oven to 400 degrees.

In a large mixing bowl, combine strawberries, raspberries and blueberries (be careful while stirring; fresh raspberries can be mushy!). Add sugars and place in a sieve. Place sieve over a mixing bowl or the sink and let berries drain for about 20 minutes. 

Return the berries to mixing bowl and add cornstarch, cinnamon and salt. Pour into prepared pie crust, then top with other crust (either a regular crust or a lattice, as shown here)

Bake in preheated oven at 400 for 20 minutes, then lower temperature to 340 to bake for another 40-50 minutes.

Thursday, August 30, 2012

Classic Southern Cornbread

Has anyone read The Help? If you haven't, I'm sure you've heard of it or seen the movie. I read it a couple years ago, and thought it was a great book and I loved the movie too. Well, my dad just finished it and said he wanted me to make some "southern" recipes. Every time he closed the book he would say, "This book makes me hungry". Then he would proceed to go make himself a snack.


On Saturday, I decided to make this cornbread to go with dinner. I had a surprisingly hard time finding cornmeal - I had looked for it in the grocery store before with no luck, so I ended up getting it at the health food store. Then I went to the grocery store and saw it there too. Go figure. Either way, I got the cornmeal and made this delicious cornbread, so it was all worth it in the end!


My dad really enjoyed it too. I think it may be the first of many Southern recipes that I will be making in the next little while - his next request is "caramel cake", like Minny makes in The Help. If you have a good recipe, let me know!

Classic Southern Cornbread
Adapted from Food Network
Makes an 8 x 8 in. dish of cornbread

  • 5 Tbsp. unsalted butter
  • 3/4 cup yellow cornmeal
  • 3/4 cup all purpose flour
  • 1 1/2 tsp. baking powder
  • 1/2 tsp. baking soda
  • 1/2 tsp. salt
  • 1 cup buttermilk
  • 2 large eggs
Preheat oven to 425 degrees and grease an 8x8 inch square pan. 

Melt butter in the microwave and let cool. 

In a small bowl, mix together the cornmeal, flour, baking powder, baking soda and salt. Set aside. In a large bowl, beat eggs, buttermilk and cooled butter. Gradually add the flour mixture, stirring until just combined. 

Pour batter into pan and cook until it just begins to brown and a toothpick comes out clean, about 20 minutes. Cool for 10 minutes before serving.

Monday, August 27, 2012

Homemade Pizza Dough

Pizza is such a great dinner (or lunch. Or breakfast, if you're feeling that way). It always satisfies, and everyone loves it. My family usually prefers pizza of the thin crust variety, but for those days when only a chewy, thick crust will do, this crust recipe is perfect.


Pizza is always sort of known as a typical Friday night I-don't-feel-like-cooking kind of meal, but lately it's gotten more of a makeover. There are a few great pizza restaurants where I live, and they have some really creative toppings these days! One of my favorite pizzas has always been pesto and cheese. If you haven't tried it, do it! It's fantastic. But for this pizza, we just chose good ol' pepperoni and cheese.


If you're feeling like pizza and you're in the mood to make it yourself, you should try this recipe out for sure. It's easy, delicious and you can top it with whatever you like. Plus, it freezes really well, so you could take it out on one of those lazy days and you'll have pizza before the delivery man would make it to your door.


Pizza Dough
From Allrecipes
Makes two normal sized round pizzas

  • 2 1/4 tsp. active dry yeast (1 pkg.)
  • 1/2 tsp. brown sugar
  • 1 1/2 cups warm water
  • 1 tsp. salt
  • 2 Tbsp. olive oil
  • 3 1/3 cups all-purpose flour
Dissolve yeast and brown sugar in a large bowl and let sit for 10 minutes. 

Stir salt and oil into yeast mixture, then add 2 1/2 cups of flour. 

Turn the dough out onto a well floured surface and knead in more flour until dough isn't sticky. Form into a bowl and place in a well oiled bowl, turning once to cover top in oil, and cover with a kitchen towel. Let rise until doubled in size, about one hour. Punch down dough and let rest a minute before rolling out. Divide into two balls and roll out into round shapes to fit pizza pan.

Preheat oven to 425 degrees. Grease pizza pan and let rolled out dough rise for 15 minutes before topping. Add toppings and bake in preheated oven for for 15 to 20 minutes.

*Note: If freezing all or half of dough, wrap in plastic wrap right before rolling out.


Friday, August 24, 2012

M&M Cookies

Remember when, in this post, I talked about how kids can never resist sprinkles? Like, on anything? Well, the same goes for M&Ms. It must be all the colours, because an M&M cookie somehow seems infinitely better than a chocolate chip cookie.


My sister told me that she had to bring food a party at her day camp this week, so I decided that I would make her some cookies, seeing as I wasn't doing anything anyways. After thinking about a few different possibilities, I decided to make M&M cookies, because I knew they would be a hit.


And they were! I may have stolen a few before she took them to camp, and they sure were delicious! The dough was vanilla-y (I like to make up words) and the M&Ms added a nice crunch. This is a great recipe that kids (and everyone else) will love.

M&M Cookies
Adapted from How Sweet It Is
Makes 36 cookies

  • 2 cups + 2 Tbsp. all-purpose flour
  • 1/2 tsp. baking soda
  • 1/4 tsp. salt
  • 12 Tbsp. unsalted butter, melted and cooled
  • 1 cup brown sugar
  • 1/2 cup granulated sugar
  • 1 egg + 1 egg yolk
  • 2 tsp. vanilla extract
  • 1 cup M&Ms
Preheat oven to 325 degrees.

In a bowl, mix the flour, baking soda and salt. Set aside.

In a large bowl, beat the butter and sugars. Add egg, egg yolk and vanilla, and beat until all ingredients are fully combined. 

Gradually add the flour mixture to the butter mixture, and stir until dough forms. Add M&Ms, folding in until fully incorporated (it is a thick dough, so just keep working them in, even though it's a bit tough). 

Roll the dough into balls and place on greased cookie sheets. Bake in oven for 9-12 minutes.

Enjoy!


Free Blog Template by June Lily