Friday, June 29, 2012

Strawberry, Chicken & Feta Salad

I love salads. They're so healthy and delicious, and so refreshing in the summer. Usually, you don't even have to turn on your oven!


I just realized that I have almost as many salads in my recipe archive as desserts. That's just weird, but I do really love salads. A lot. Especially this one! It's got grilled chicken, crumbled feta, toasted almonds, fresh strawberries and crispy lettuce. Oh, and the best dressing I've ever made in my life. Seriously. Even if you don't make the salad, just make the dressing. It's. So. Good.


Strawberry, Chicken and Feta Salad
adapted from Chatelaine
Makes 4 dinner servings

For the salad:
  • 2 boneless, skinless chicken breasts
  • 4 cups lettuce (I used romaine)
  • 1 cup chopped, sliced strawberries
  • 1/2 cup toasted almonds
  • 3/4 cup crumbled feta
For the Dressing:
  • 1/3 cup olive oil
  • 1/3 cup sliced strawberries
  • 2 Tbsp. white wine vinegar
  • 2 tsp. honey
  • 1/4 tsp. salt
In a blender or food processor, whirl olive oil, strawberries, vinegar, honey and salt until fully pureed.

Preheat BBQ to medium. Brush chicken with a little bit of the dressing, then season with salt and pepper. Grill chicken for 8 minutes, then flip and grill for another 8-10 minutes. Remove and let rest five minutes, then slice.

Divide lettuce among four plates and top with strawberries, feta, almonds and chicken. Drizzle with dressing and serve.

Thursday, June 28, 2012

Mini Oreo Stuffed Chocolate Chip Cookies

A cookie inside of a cookie...


What's not to love? Well, when I first saw the original recipe on Picky Palate, I thought that they looked fantastic but they were just so big. Well, when I saw these cookies, a mini version of the originals, I couldn't put it off any longer.

The first time I made them, I couldn't find mini oreos, so I cut some big ones in half, but the second time, when I found the mini ones, they were SO much better! Oreos are my favorite "store-bought" cookie, and chocolate chip cookies are my favorite "home-made" cookie, so I get the best of both worlds when I eat these!


Mini Oreo Stuffed Chocolate Chip Cookies
Slightly adapted from Picky Palate
Makes 2-3 dozen cookies
  • 1/2 cup softened butter
  • 1/3 cup brown sugar
  • 1/2 cup white sugar
  • 1/2 Tbsp. vanilla
  • 1 egg
  • 1 3/4 cups flour
  • 1/2 tsp. baking soda
  • 1/2 tsp. salt
  • 3/4 cup chocolate chips
  • 1 bag mini Oreos
Preheat oven to 350 degrees. 

In a large bowl, beat butter and sugars until combined. Add eggs and vanilla, stirring until thoroughly combined.

In a separate bowl, mix the baking soda, salt and flour. Slowly add to the butter mixture, stirring until fully combined. Add in chocolate chips.

Take a small scoop of cookie dough and place on a greased cookie sheet. Place one mini Oreo on top, then cover with another small cookie dough ball. Using your fingers, pinch the edges together, then roll into a ball using your hands. Follow these steps for the remaining dough.

Bake cookies in preheated oven for 8-11 minutes.

Wednesday, June 27, 2012

Cookie Dough Brownies

These are a little ridiculous.


But who cares? They're delicious. I mean, two amazing things sandwiched together? What's not to love?

I've always loved to eat cookie dough (who doesn't?), but I know that you're not really supposed to. And you definitely couldn't bring someone brownies topped with the stuff and say "Here, have some brownies topped with a raw egg". That just wouldn't be acceptable.

Luckily for all of us cookie dough (and brownie) lovers out there, these brownies are topped with EGG FREE cookie dough. Yum!

Unfortunately, now that I know how to make tasty cookie dough that's safe to eat, I might just be making some. By itself. That I can eat with a spoon. 

Cookie Dough Brownies
Adapted from Buns in my Oven and Allrecipes
Makes one 9 x 13 inch tray of brownies

For the brownies:
  • 1 cup butter
  • 2 cups white sugar
  • 4 eggs
  • 2 tsp. vanilla extract
  • 2/3 cup unsweetened cocoa powder
  • 1 cup all purpose flour
  • 1/2 tsp. salt
  • 1/2 tsp. baking powder
For the cookie dough:
  • 3/4 cup unsalted butter, softened
  • 3/4 cup white sugar
  • 3/4 cup brown sugar
  • 3 Tbsp. milk
  • 1 tsp. vanilla
  • 1 1/2 cups flour
  • 1 cup semisweet chocolate chips
To prepare brownies, preheat oven to 350.  Melt butter in a large saucepan over medium heat. Once melted, remove from heat and stir in sugar, vanilla and eggs. Beat in cocoa, flour, salt and baking powder. Pour into a greased pan and bake for 25-30 minutes.

To make cookie dough, beat softened butter with sugars. Beat in milk and vanilla. Slowly add flour. Once fully mixed, add chocolate chips (I used regular-sized chocolate chips because I had them on hand, but I think mini ones would get distributed better). 

Once brownies are completely cool (or even cold), frost with cookie dough. Spread evenly over top, then use your hands to pat it down and make it evenly cover the brownies. Wrap in plastic and refrigerate at 1-2 hours to make cutting easier.


Tuesday, June 26, 2012

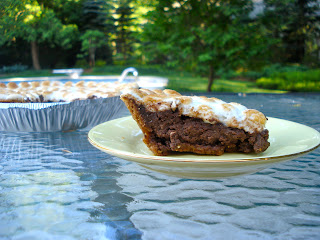
S'mores Pie

Summer is finally here! I wrote my last exam on Monday afternoon, and now, finally, it's officially summer. There are many things that I always look forward to doing in the summer; swimming, barbecuing, going to the beach, campfires... and eating s'mores.

S'mores are the ultimate summer food. They're like pumpkin pie in the sense that you just can't eat them  at any other time of year. This dessert embraces all the flavours of s'mores and puts them into pie form.


See those? They're toasted, bubbly, warm marshmallows. Yum! A graham cracker crust is filled with creamy chocolate filling, then topped with mini marshmallows. It was absolutely delicious!


S'mores Pie
Adapted from Pastry Affair
Makes 8 servings
  • 1 store bought graham cracker crust (you could make your own, if you want)
  • 3/4 cup heavy cream
  • 3/4 cup milk (I used nonfat)
  • 1 1/4 cup semisweet chocolate chips
  • 1 large or extra large egg, whisked
  • 1 bag mini marshmallows
Preheat oven to 325 F.

In a medium saucepan over medium-low heat, whisk cream and milk until warm. Once milk is warm, add chocolate chips and whisk until melted. Slowly add eggs (so they don't scramble) and whisk until smooth.

Pour filling into pie crust. Bake in oven for 20-30 minutes (the original recipe said to bake until filling doesn't jiggle, but that never happened for mine, so I just took it out after 30). Once pie is out, turn on broiler.

Arrange mini marshmallows on top of pie. Place pie under broiler and WATCH CAREFULLY!! The marshmallows can burn quickly. Mine only needed two minutes.

Chill pie in refrigerator for at least two hours, or until ready to serve. 

When serving pie, grease knife first, then cut pie. Once sliced, heat individual slices in the microwave for about 15 seconds, the DIG IN!


Monday, June 25, 2012

Nutella Banana French Toast - For One!

A lot of people like to sleep in on Saturday mornings. I would be one of them - well, if I could that is.

No matter how hard I try, I'm always just ready to get up at 7 am. Sometimes earlier. I know, what's wrong with me?

Anyways, when I get up, I always eat breakfast right away, because I'm hungry. This doesn't work out for having breakfast with my sister, because she usually gets up later (plus cereal is pretty much my favourite food, so I eat it every. single. morning.) When she does get up, she usually wants pancakes or waffles or something along those lines.


Luckily, this recipe makes enough for one! I whipped it up while she was watching cartoons, and it was ready in no time!

Nutella Banana French Toast - For One!
  • 1/2 Tbsp. butter
  • 2 slices bread
  • 1 Tbsp. nutella, divided between both slices of bread
  • 1/2 banana, cut into slices
  • 1 egg
  • 3 Tbsp. milk or cream
Heat a small skillet to medium heat. Melt butter.

Spread nutella evenly over both slices of bread. Put banana on one slice, then to with the other slice.

Beat egg and milk in a shallow dish. Dip both sides of your nutella "sandwich" in and let it soak up the egg mixture (there might be a bit left over), then place in frying pan. Flip when golden.

Enjoy!


Friday, June 22, 2012

Brown Butter Chocolate Chip Oatmeal Cookies

Brown butter is one of those "food fads". You see it on all the blogs, you hear all about how amazing it is on twitter, etc, etc... and then it's on to the next "great" ingredient.

Well, after seeing and hearing so much about it, I decided to try it in a recipe. I went with cookies because, well, cookies are my favourite food group. So yesterday, with a science exam behind me and a math exam the next day, a took a study break and baked these.


I've made cookies with melted butter before (left it in the microwave to "soften" a little too long...oops!), and the cookies always turn out flat, and they spread together. That's what I thought would happen to these, but no! They stayed together nicely.

They have a bit of cinnamon, just like in regular cookies, which I thought complemented the nutty flavour of the brown butter nicely. The smell of the butter when you're browning it is so great that you should make these cookies for the smell alone!


Brown Butter Oatmeal Chocolate Chip Cookies
Slightly adapted from How Sweet It Is
Makes 20-24 cookies

  • 1/2 cup unsalted butter
  • 1/2 cup packed brown sugar
  • 1/2 cup granulated sugar
  • 1 egg
  • 2 tsp. vanilla extract
  • 1 1/4 cup all purpose flour
  • 3/4 cup oats
  • 1/4 tsp. salt
  • 1/2 tsp. baking powder
  • 1 tsp. cinnamon
  • 3/4 cup chocolate chips
Add butter to a small saucepan over medium-low heat. Whisking constantly, cook butter until bubbles begin to form and you see little brown specks. This will take about 10 minutes. Once this happens, take butter off the heat and continue to whisk about 30 seconds. Let butter cool completely (until it is no longer warm to the touch - you could put it in the fridge, but be sure to watch closely, as you don't want it to solidify again!) 

Combine flour, oats, salt, baking powder and cinnamon in a small bowl. 

Once butter is cooled, beat with sugars, egg and vanilla. Slowly add dry ingredients and mix to combine. Fold in the chocolate chips once dough has fully come together.

Form cookies into a ball using two spoons or your hands (my preferred method!). Bake cookies in a 375 degree oven for 10-12 minutes. 


Thursday, June 21, 2012

Grilled Sausage and Corn Salad

This is my cat.


He's pretty cute. Even though he only has one ear (long story). He also has the tendency to behave like a dog. In what way, you might ask? In the way that HE EATS EVERYTHING.

I got the corn out to make this salad, left the room for a couple of minutes, and when I came back, there were TWO corn cobs on the ground. With no corn on them. Sigh. Luckily, I had more corn in the fridge.


All that aside, this salad is the perfect meal for a hot summer day. It's light and refreshing, plus you don't need to turn on your oven! We served it with balsamic vinaigrette, but you could use whatever dressing you like.

Grilled Sausage and Corn Salad
Adapted from Chatelaine
Serves 4 as a main course


For the salad:
  • 4 cobs of corn
  • 4-5 Italian sausages (I used turkey)
  • 8 cups of mixed salad greens
For the dressing:
  • 1/4 cup olive oil
  • 2 Tbsp. balsamic vinegar
  • 1/4 tsp. salt
  • 1 clove minced garlic
Preheat BBQ to medium high heat. Meanwhile, boil water to cook corn. Once water is boiling, add corn cobs and cook for 10-15 minutes, or until done (it's always hard to tell with corn).

Put sausages on BBQ, and grill for 10-15 minutes, or until internal temperature reaches 165 F.

While sausages and corn are cooking, make dressing. Combine oil, vinegar, salt and minced garlic in a bowl. Set aside.

Divide lettuce, corn and sausage evenly among plates. Top with dressing, or serve it on the side.


Wednesday, June 20, 2012

Caprese Couscous Salad

Couscous. Just try saying that five times in a row and not laughing. It's just such a fun word to say.


Anyways. The only kind of couscous I'd ever had until recently was the really tiny kind (you know...regular couscous). A while ago, I got some pearl (or Israeli) couscous at the grocery store, and I just didn't know what to do with it. I checked out a lot of recipes of Food Gawker and a bunch of food blogs, but none of them were really calling my name. Then I thought of it...Caprese Couscous! 


This couscous salad combines all the flavours of a traditional Caprese in a delicious side dish, but changes them up a bit. The tomatoes are roasted and the buffalo mozzarella is in pearl form. Once the mozzarella hits the hot couscous, it melts a bit and it is so delicious. I hope you enjoy!

Caprese Couscous Salad
Serves 4 as a side dish

  • About 25 cherry tomatoes
  • 1 Tbsp. olive oil
  • 1/2 cup buffalo mozzarella pearls
  • 1/4 cup chopped fresh basil
  • 1 cup Israeli or pearl couscous
  • 1/4 tsp. salt
Heat oven to 400 F. Once heated, place tomatoes on a baking sheet lined with foil, and drizzle olive oil over top. Liberally sprinkle with salt and roast tomatoes in oven for about 15 minutes.

Meanwhile cook couscous. Place one cup couscous into 1 3/4 cups boiling water. Reduce heat to simmer, cover, and let cook 10 minutes or until all liquid is absorbed. Add salt to couscous as it is cooking.

Once couscous is done, add tomatoes, basil and cheese. Stir to combine. Serve immediately.

Tuesday, June 19, 2012

Carrot Muffins

Carrot muffins are one of my favourite types of muffins.


Probably because they taste like carrot cake, but they're an appropriate breakfast food because they aren't smothered in cream cheese frosting. Whatever. But I also always thought they were pretty healthy because, hello, CARROT? That's totally a vegetable, which means it's healthy, right? Wrong. Imagine my dismay when I learned that the fattiest, most high-calorie muffin at Tim Hortons (I'm a real Canadian, eh?) was the whole grain carrot muffin. I mean, who would've known?

Luckily, these carrot muffins are really healthy! Even with a pat of butter, they are low in fat and calories, but they still taste great. They have applesauce instead of the usual oil, and, of course, carrots! They're a perfect snack.


Carrot Muffins
Adapted from The Accidental Weekend Chef
Makes 12 muffins

  • 1 1/2 cups all purpose flour
  • 1 1/2 tsp. baking soda
  • 1 tsp. baking powder
  • 1/2 tsp. salt
  • 1 tsp. cinnamon
  • 1/2 tsp. nutmeg
  • 2/3 cup granulated sugar
  • 1 cup shredded carrots
  • 3 eggs
  • 2/3 cup applesauce
Preheat oven to 350 degrees.

In a large mixing bowl, combine flour, baking soda, baking powder, salt, cinnamon, nutmeg and carrots.

In a separate bowl, beat eggs and applesauce. Add to flour mixture and fold in until just combined. Do not over mix.

Pour batter into a greased or lined muffin tin. Bake in oven for 20 minutes, or until toothpick comes out clean.

Serve warm with butter!


Monday, June 18, 2012

Lemon Poppyseed Pancakes

On Sunday morning, I woke up to the sound of thunder and rain, which was then followed by bright flashes of lightning. Summer must be well on its way if we're getting thunderstorms!


Because it was such a rainy, blah kind of day, I decided to make pancakes for breakfast. I was going to put blueberries in them, but then I thought of the Lemon Poppyseed Loaf from Starbucks that I like so much and... BINGO! Lemon Poppyseed Pancakes!


These pancakes have a great lemon flavour. They're not too sweet, not too sour and the poppyseeds and a nice speckled look (just make sure they don't give your teeth a nice speckled look too...). 

Lemon Poppyseed Pancakes
Makes approximately 8 pancakes
  • 1 cup flour
  • 2 tsp. baking powder
  • 1/4 cup granulated sugar (less if you want)
  • 1 cup milk
  • 1/4 cup applesauce
  • 1-2 tablespoons poppyseeds
  • 1-2 teaspoons lemon juice (there is no raw egg, so try a bit of the batter to see if you want more lemon juice)
  • 1 tsp. grated lemon rind (optional)
Combine all dry ingredients in a bowl. Stir in milk, and, once combined, apple sauce.

Once batter is made, add in lemon juice and poppyseeds. Taste batter to see if you want more lemon flavour.

Preheat and grease your skillet or griddle to medium heat. When it is hot enough, ladle in batter to form pancakes of desired size. Once you can see little bubbles around the edges, you know it's time to flip.

Serve with maple syrup and enjoy!

Yum.


Friday, June 15, 2012

Feta and Watermelon Quinoa

One of my very favourite food blogs is How Sweet it Is. The recipes are always great and so are the pictures. A few weeks ago when I saw this recipe, it was calling my name! I love quinoa, feta cheese is fantastic, and there was a gigantic watermelon in my fridge just waiting to be cut open (plus I got to use some more of that basil from my garden that I used when I made pesto).

I made it as a side with grilled salmon, and it was a hit. It made enough to have leftovers too, so I ate some for lunch over the next couple of days. When I made it, I wasn't sure how well the leftovers would hold up because of the watermelon (I thought it might get soggy), but they tasted just as good (if not better) the next day.


Watermelon & Feta Quinoa
slightly adapted from How Sweet It Is
Makes 4-6 side servings
  • 1 cup uncooked quinoa, rinsed
  • 3/4 tsp. salt
  • 1 1/2 cups fresh watermelon, diced
  • 1 Tbsp. honey
  • 2/3 cup crumbled feta cheese
  • 15-20 leaves of basil, roughly chopped
  • 1 tsp. lime juice
Cook quinoa in two cups of water (follow directions on box). Let quinoa cool completely, then toss in 1/2 tsp. salt.

Toss chopped watermelon with honey and remaining salt. In a large bowl, combine cooled quinoa with watermelon, feta and basil. Add lime juice and toss again. Refrigerate if you want it as a cold salad, or serve immediately at room temperature.


Thursday, June 14, 2012

Homemade Basil Pesto

When I was little, I didn't like tomato sauce on my pasta like most of the other kids did. Strangely enough, pesto was one of my favourite foods. This seems weird, because most kids would turn their noses up if they were served spaghetti with GREEN sauce. But not me. I loooved it!


Even though I've eaten pesto on a regular basis for my whole life, we never made it from scratch. We always got the same brand, which was delicious, but they recently stopped selling it. We tried other brands, but none of them compare to the deliciousness that came in that little glass jar. Sigh.

Luckily, I recently discovered how easy it is to make!

Look, I even used basil from my garden!
Well, supplemented by some from the store...

This recipe is more of a traditional pesto, made with basil, pine nuts and parmesan cheese. That's the only way I've ever known it, and I was surprised when I saw so many recipes that used almonds or walnuts, and some even left out the basil all together! Also, I recommend using a food processor over a blender. I've done both, but the food processor definitely does the job better (and faster!).

Homemade Basil Pesto
  • 1/4 cup pine nuts, toasted
  • 1/4 cup parmesan cheese, grated
  • 3-4 Tbsp. olive oil (depending on how thick you like it)
  • 1 cup chopped, fresh basil leaves
  • 1-3 cloves of garlic, depending on size and personal preference
Preheat oven to 350 degrees, then toast pine nuts until fragrant, about 8 minutes, stirring a few times.

While nuts are toasting, wash and chop basil. 

Add basil, pine nuts, cheese, garlic and a few tablespoons of oil to food processor.

Whirl until blended. If it's not coming together, add a few more tablespoons of olive oil through the spout, one at a time, until pesto reaches desired consistency. 


This was delicious on cheese tortellini, but has anyone ever had pesto pizza?
Now THAT is tasty!

Wednesday, June 13, 2012

Mini Nutella Donut Muffins

Have you ever seen the ads for nutella on TV? They totally make it out to be a "health food". I don't know how they can even say that that's true, seeing as it is a chocolate spread. They used to do that with cereal too. I don't know how many commercials I saw while watching Saturday morning cartoons that described a sugary cereal as "part of a nutritious breakfast".


Well, one thing I know for sure is that when you pair nutella with the word "donut", it takes away the apparent "health factor" (although muffins are seemingly nutritious...so maybe these really are healthy). Either way, these are some delicious muffins, especially when they are fresh out of the oven and still warm. I made them as mini muffins, but you could make them regular sized as well.


Nutella Donut Muffins
adapted from US Masala
Makes 24 mini muffins
  • 1 3/4 cup all purpose flour
  • 1 1/2 tsp. baking powder
  • 1/2 tsp. salt
  • 1/2 tsp. cinnamon
  • 1/3 cup oil
  • 3/4 cup sugar
  • 1 egg
  • 3/4 cup milk (I used unsweetened vanilla almond to add extra flavour, but any milk will do)
  • 1 tsp. vanilla
  • Nutella as needed
  • 3 Tbsp. butter (for topping)
  • 1/3 cup sugar (for topping)
  • 1 tsp. cinnamon (for topping)
Preheat oven to 350 degrees and grease two mini muffin pans

Combine flour, baking powder, salt and cinnamon in a medium bowl.

Combine oil, sugar, milk, vanilla and egg in a large bowl. Add flour mixture, and be sure not to over mix.

Add a small bit of batter into each muffin cup. Top with a small spoonful (about 1/2 - 1 tsp.) of nutella in each, then cover with more batter.

Bake muffins for 15-20 minutes. While muffins are baking, melt butter and mix together the sugar and cinnamon. 

Once muffins are out of oven and still warm, dip each muffin top in melted butter, then roll in cinnamon sugar. 

Enjoy while still warm!


Tuesday, June 12, 2012

Funfetti Ice Cream Sandwiches

Whenever I go into an ice cream shop, I always see little kids with ice cream cones covered in sprinkles. There must be something about those colourful little balls of sugar that they just can't resist. But who can blame them? I mean, isn't everything better with a little bit of colour?


Well, these ice cream sandwiches will definitely be popular with sprinkle-loving kids. Sugar cookies are tasty on their own, but with sprinkles baked right inside? Even better.


These ice cream sandwiches will be a hit with everyone, not just kids. I mean, cookies, ice cream AND sprinkles? What's not to love?

Funfetti Ice Cream Sandwiches
Cookies adapted from allrecipes
Makes about 20 cookies, or 10 sandwiches
  • 1 1/4 + 2 Tbsp. all purpose flour
  • 1/2 tsp. baking soda
  • 1/4 tsp. baking powder
  • 1/2 cup butter, softened
  • 3/4 cup white sugar
  • 1 small egg, or 1/2 of a large egg
  • 1/2 tsp. vanilla
  • 1/4 cup rainbow sprinkles
  • Vanilla ice cream
Preheat oven to 375 degrees. In a small bowl, combine flour, baking soda and baking powder.

In a large bowl, cream the butter and sugar. Add in egg and vanilla.

Gradually mix the flour mixture into the egg mixture until combined.

Once dough is mixed, add sprinkles and stir until sprinkles are evenly distributed.

Roll cookies into evenly shaped balls and place on an ungreased cookie sheet.

Bake 8-10 minutes or until golden. Bake the cookies so that they are soft rather than crunchy, because once they've been in the freezer, they will be hard to eat.

Let the cookies cool completely before filling with ice cream.


If you're feeling adventurous, try these with a different kind of ice cream. I think cake batter would be great with the "funfetti" theme. Something bright like strawberry, cotton candy or bubble gum would be fun too!

Monday, June 11, 2012

Zucchini-Banana Walnut Muffins

Some people firmly believe that vegetables don't belong in baked goods. Well, they can feel that way if they like, but they are missing out on some pretty tasty muffins. And carrot cake. I mean, who doesn't love carrot cake?

Up until recently, I had never eaten zucchini in muffin form. I'd eaten it sauteed, grilled and cooked pretty much every way, just never in something other than a vegetabl-y dish.


Let me tell you, these muffins definitely don't taste vegetabl-y. Actually, if you didn't know there was zucchini in them, you might never know (well, until you see the little green flecks...). Even my nine-year-old sister loves them! The zucchini doesn't really take on a flavour, but it adds lots of moisture, and so do the bananas. They're actually pretty healthy too!

Zucchini Banana Walnut Muffins
Recipe adapted from Delishhh
Makes 24 large muffins

  • 2 eggs
  • 1/4 cup honey
  • 1 cup mashed banana
  • 1/2 cup brown sugar
  • 1 tsp. vanilla 
  • 1 3/4 cup all purpose flour
  • 1 tsp. salt
  • 1 tsp. baking powder
  • 1/2 tsp. baking soda
  • 2 cups zucchini, shredded (about 1 medium zucchini)
  • 1/3 cup chocolate chips
  • 1/3 cup walnuts
Preheat oven to 350 degrees

In a large mixing bowl, beat together banana, honey, eggs, sugar and vanilla.

In a separate bowl, combine flour with salt, baking soda and baking powder. Mix into banana mixture.

Fold in the zucchini, chocolate chips and walnuts.

Pour mixture into lined muffin cups and bake in preheated oven for 20 minutes, or until toothpick comes out clean.


Free Blog Template by June Lily