Sunday, December 30, 2012

Most Viewed Recipes of 2012

Even though this blog is relatively new, I thought I would make a "Most Viewed" list. It's the most viewed of 2012...and of all time! The five recipes here are actually some of my favourites that I made , so I hope you enjoy!


This one was a big hit with my family! It's a delicious chocolate pie in a graham cracker crust with toasted marshmallows on top. YUM!


I made these on a whim one Sunday morning and I was surprised that they turned out to be such a hit! They are pretty delicious though! 


Anyone who knows my sister knows that she is OBSESSED with zebras. We made these for her class on her birthday - she said that they loved them!


These were one of the first recipes I posted, and I thought they were really cute. They're super fun, and kids are guaranteed to love them because what kid doesn't like sprinkles?

Aaaand (drumroll please...) the number one most viewed post of 2012 is...

1. Kit Kat Cake


This cake was so fun to make, and very impressive. It looks fantastic, but it's actually so easy to make! Give it a try!


Well, those are the top recipes this year! Hopefully there will be lots more yummy recipes coming your way in the New Year! 

Friday, December 28, 2012

Cranberry Pecan Baked Brie (& Some Holiday Veggies!)

One of the great things about turkey dinners is getting to eat all the things that you really only eat with turkey. Like stuffing...and cranberry sauce. I've always loved cranberry sauce, but I really only eat it on Christmas and Thanksgiving. 


I made this recipe on Christmas, but I think it would be great anytime in the holiday season...or any other time for that matter! Cranberries and brie go really well together, and the pecans give it a little something different. It's a great appetizer, and is sure to be popular at your next party!

Cranberry Baked Brie
  • 1 wheel brie cheese
  • 1/2 cup cranberry sauce (adjust accordingly if your cheese is bigger or smaller)
  • 1/2 tsp. orange zest
  • 1/3 cup pecans
Heat oven to 350 degrees. Place brie in an oven safe dish, and bake for 10 minutes. Remove from oven, top with cranberry sauce and pecans, and return to oven to bake 5 more minutes, until cheese is melty. 

Serve in oven-safe dish, or carefully transfer to a different plate. Serve with crackers.


On a related note, another appetizer I made for Christmas was this veggie tray. I thought it was too cute not to share. There's not really a recipe...just arrange the veggies in a Christmas tree shape!


Monday, December 24, 2012

Rosemary Clover Rolls

Don't you love it when you go to a restaurant and you're absolutely STARVING, and then the waiter brings a basket of warm rolls to your table? Sure, sometimes it's disappointing because it's not the tastiest piece of bread in the world, but usually, I'm too hungry to tell.

You're not going to have that disappointment with these rolls, though.


They're absolutely fantastic. They're soft, fluffy and taste great just fresh out of the oven. We had them with turkey, and the rosemary complements turkey perfectly. It made me think that these would be great to serve for Thanksgiving!


Another thing that's great about them is that you don't need any special ingredients like bread flour. I literally decided to make them to eat with dinner Sunday night, and we had all the ingredients on hand. You probably do too! How many more reasons do you need to make these rolls to serve to your family tonight?

Rosemary Clover Rolls
Adapted from How Sweet It Is 
Makes 15 rolls
  • 1 pkg. active dry yeast (2 1/4 tsp.)
  • 1 1/2 Tbsp. olive oil, divided + extra for brushing tops
  • 1/2 cup warm water
  • 2 Tbsp. honey
  • 1/2 large egg
  • 2/3 cup warm milk
  • 2 Tbsp. unsalted butter, melted
  • 3 cups flour
  • 1 tsp. salt
  • 1 tsp. dried rosemary leaves
In a large bowl, combine yeast, 1/2 Tbsp. olive oil, 1/2 Tbsp. honey and water. Let sit for 10-15 minutes until yeast gets foamy. Add egg, milk, butter and remaining honey, mixing until just combined. Add 1 cup of flour, salt and rosemary. Continue adding flour, 1/2 cup at a time, until you reach 2 1/2 cups of flour added. Flip dough out onto a floured surface and knead 5-10 minutes, adding more flour as you go. Dough should be a bit sticky, but easy to work with. Roll dough into a ball and place in a bowl coated with remaining 1 Tbsp. of olive oil. Flip so all dough is covered and let rise about 1 1/2 hours. 

Punch dough down. Grease muffin tins. Rip off small pieces of dough and roll into balls, placing three in each muffin cup. Cover and let rise for another hour. 

Once dough has risen, preheat oven to 375 degrees. Brush each roll with olive oil, then place in oven and bake for about 12 minutes, until tops are golden brown. Remove from tins and serve warm.

*Note: I made 12 regular sized rolls, then another 12 in a mini muffin tin.

Friday, December 21, 2012

Brownie Covered Oreos

If you've ever read the blog Picky Palate, you'd know that it features lots of delicious recipes using Oreos (these tasty cookies are from a Picky Palate recipe too!). Well, these brownies combine two delicious treats and make them into one fabulous dessert!


They're really cute. I think they almost look like those two-bite brownies you can get at the grocery store...but they taste much better!! The Oreo on the inside bakes and becomes kind of soft...yum! You'll love them...especially warm from the oven.


Brownie Covered Oreos
Adapted from Picky Palate
Makes about one bag of Oreos
  • One package double-stuffed Oreos
  • One package brownie mix
  • 1 cup icing sugar
  • 1 - 2 Tbsp. milk
Preheat oven to 350 degrees.

Prepare brownie mix according to package directions. 

Dip Oreos into brownie mix, flipping to make sure they're covered. Place in a well-greased muffin tin.

Bake in preheated oven for 12-15 minutes. Immediately after taking them out of the oven, run a knife around the edge of each muffin cup to ensure brownies don't stick!

To make icing, mix icing sugar with milk, starting with one Tbsp. and adding more as needed. Transfer to a piping bag or a ziplock with a tiny hole cut in the corner and pipe designs onto completely cooled brownies. 

Enjoy!

Thursday, December 13, 2012

Candy Cane Brownies

Wow, I'm really going for the candy cane theme this week! This recipe is a little different from Monday's recipe though...those Rice Krispie Treats were just shaped like candy canes...these really taste like them! But even better because, I don't know about you, but I've never seen a candy cane that has CHOCOLATE in it.


I absolutely love the combination of mint and chocolate (mint chip ice cream, anyone?), and it seems to be a go-to pairing around the holidays.


These brownies are delicious, and would be a perfect addition to any holiday sweet tray!

Candy Cane Brownies
Adapted from Our Best Bites
Makes 16 brownies

For the brownies:
  • 1/2 cup (1 stick) unsalted butter
  • 2 eggs
  • 1 tsp. vanilla
  • 1 cup granulated sugar
  • 1/3 cup cocoa
  • 1/2 cup flour
  • 1/4 tsp. baking powder
  • 1/4 tsp. salt
For the frosting:
  • 1 1/2 cups powdered sugar
  • 3 Tbsp. unsalted butter, softened
  • 1 tsp. peppermint extract
  • 1-2 drops red food colouring
  • 1 Tbsp. milk (adding more by the tsp. if needed)
For the chocolate glaze:
  • 3 oz. semi-sweet chocolate (3 baking squares)
  • 3 Tbsp. unsalted butter
  • 3-4 candy canes, crushed (enough to cover the top of the brownies)
Line an 8x8-inch baking dish with foil and preheat oven to 350 degrees.

In a large saucepan over medium heat, melt butter. Once melted, add sugar, eggs and vanilla, beating well to combine.

Next, beat in the cocoa, flour, baking powder and salt. Once combined, pour into lined dish. Bake in preheated oven for 25-30 minutes. Do not over bake. Let brownies cool completely before frosting.

To make frosting, beat butter with powdered sugar, peppermint extract, food colouring and milk. If the frosting isn't quite coming together, add more milk, a teaspoonful at a time. Spread evenly over brownies and place in fridge to chill.

To make glaze, melt chocolate with butter in the microwave, stirring every 30 seconds until smooth and fully melted. Let cool for a few minutes, then pour over the frosted brownies. Spread it around quickly so that the chocolate doesn't harden. Sprinkle with crushed candy canes and return to fridge to allow chocolate to set. 


Monday, December 10, 2012

Candy Cane Rice Krispie Treats

Rice Krispies are one of my favourite cereals. Cereal is pretty much one of my favourite foods, and I eat it practically every day. I go through phases with other cereals, but one that I always love is Rice Krispies. I don't know why, they're just so darn tasty.


As much as I love them, I don't actually make Rice Krispie Squares that often. I always think that they're more complicated than they are to make, when really, they're easy! There are like, 3 ingredients. Can't get much easier than that, can it?


Okay, so these Rice Krispie treats actually have four ingredients. Sorry if that's a bit overwhelming. But   I promise, the end result is totally worth it. They're really cute and festive, perfect for Christmas. I wonder is Santa likes Rice Krispie Treats...

Candy Cane Rice Krispie Treats
Adapted from Rice Krispies
Makes about 14 

  • 28 large marshmallows
  • 2 Tbsp. unsalted butter
  • 4 cups Rice Krispies cereal
  • 1/2 tsp. vanilla
  • 3-4 pieces red shoestring licorice
In a large saucepan over medium heat, melt butter and marshmallows until smooth. Once completely melted, add vanilla.

Stir in Rice Krispies. Remove from heat. 

Using well greased hands, mold Rice Krispie mixture into candy cane shapes and place on a baking sheet lined with parchment. Wrap strings of licorice around canes. Enjoy!

Friday, December 7, 2012

Snowman Shepherd's Pie

It is December...and there is still no snow. I mean, I will be the first to admit that snow is NOT my favourite thing, but I feel like we need just a little bit. I remember at this time a few years ago we had a TON of snow. It's so funny how it changes from year to year. As long as there is some on Christmas, I will be satisfied.


To try to encourage the snow to come, I made this Snowman Shepherd's Pie! It looks really cute, and it's super easy to make! You'll impress everyone who sees it, but it takes practically no time at all.


Snowman Shepherd's Pie
Adapted From Taste of Home
Serves 4-6
  • 1 lb. ground beef (I used extra-lean, but you could sub regular or even ground turkey!)
  • 1 package gravy, prepared
  • 2 Tbsp. ketchup
  • 2 medium carrots, peeled and diced (plus a couple extra pieces for "noses")
  • 3/4 cup frozen corn
  • 1/2 cup peas, plus about 1/4 cup extra for decorating
  • 2 cups of prepared mashed potatoes 
Preheat oven to 350 degrees.

In a skillet over medium heat, brown ground beef until fully cooked. Drain and return to pan. Add vegetables and continue cooking for about 5 minutes. Add gravy and ketchup, stirring to coat.

Transfer beef mixture into an 8x8 inch baking dish. Create snowmen by using one tablespoon for each head and three tablespoons for each body. Bake in preheated oven for 20 minutes.

Once Shepherd's Pie is done cooking, press the peas into the potatoes for "eyes" and "buttons" and the carrot pieces in for "noses". You can add some ketchup "scarves" if you want, too! Serve and enjoy!

Friday, November 23, 2012

Apple Butter Muffins

Can you believe that November is almost over? I sure can't, it's just flown by! I mean, Hallowe'en was almost a month ago! Fall is coming to a close, although the weather here clearly thinks differently...today was a gorgeous, sunny day with temperatures much more appropriate to September than November...not that I'm complaining! I think the real November weather is coming later this week...


With the frost comes the end of fall fruits too, and that includes apples. I feel like this fall I've done a lot of baking with pumpkin, but not nearly enough with apples. I was craaaaving a muffin one day, and we had so many apples in the house that I just thought apple muffins would be perfect. And boy, was I right!


These apple butter muffins will make the most of those delicious, crisp apples that you still have hanging around, and the apple butter center is such a tasty surprise. They make the perfect snack!


Apple Butter Muffins


Adapted from Canadian Living
Makes 12 muffins

  • 1/2 cup canola oil
  • 2/3 cup granulated sugar
  • 1 egg
  • 1 3/4 cup flour
  • 1 cup applesauce
  • 1 1/2 tsp. cinnamon
  • 1/4 tsp. nutmeg
  • 1/2 tsp. cloves (scant)
  • 1/2 tsp. salt
  • 1 1/4 tsp. baking soda
  • 1/2 cup finely diced apple
  • 1/2 cup apple butter
Preheat oven to 350 degrees.

In a large bowl, combine canola oil, sugar, egg and applesauce.

Add flour, spices, salt and baking powder, mixing until fully incorporated. Gently fold in diced apple.

Divide half  of the batter between 12 muffin cups. Divide apple butter between muffins, then top with remaining batter. 

Bake in preheated oven for 20-25 minutes, or until cake tester comes out clean.

Thursday, November 8, 2012

Apple-Pear Crisp (in Mason Jars!)

Don't you just love cute little desserts? I sure do! There's just something that makes dessert more fun when it's cute.


We had a bunch of pears that really needed to be used up, so I decided to make pear-apple crisp. You don't really see plain pear crisp that much - mainly apple. I used some apples because I didn't have quite enough pears, but if you are a huge pear fan, feel free to substitute pears for the apples - I'm sure it would be just as delicious!


Apple-Pear Crisp (in Mason Jars)
Adapted from The Pioneer Woman
Serves 6

For the filling:
  • 4 large pears
  • 2 apples (Gala works well)
  • 1/2 cup granulated sugar
  • 1/4 tsp. salt
  • 1 Tbsp. cornstarch
For the topping:
  • 3/4 cup all purpose flour
  • 3/4 cup rolled oats
  • 1/4 cup granulated sugar
  • 1/3 cup brown sugar
  • 1/2 tsp. cinnamon
  • 1/2 cup pecans, finely chopped
  • 6 Tbsp. butter, melted
Preheat oven to 350 degrees.

Wash, peel and dice pears and apples. Place in a large bowl and add sugar, salt and cornstarch, mixing until fruit is coated. Divide fruit evenly among mason jars.

In a separate bowl, combine flour, oats, sugars, cinnamon and nuts. Drizzle melted butter over top gradually, mixing to combine.

Divide topping among mason jars; you may have a bit extra...snack time! Just kidding...sorta...

Bake in preheated oven for 30-40 minutes.

Let jars cool about 10 minutes before serving. Serve with vanilla ice cream.

Wednesday, November 7, 2012

Pumpkin Scones

Has anyone else been to Starbucks this week? Well, if you have, I'm sure you noticed that they are now serving their holiday drinks! I love their Peppermint Hot Chocolates around this time of year, but in the fall, I love all of their pumpkin spice things. The drinks are great, but my real favourite is the pumpkin scone! I don't even eat scones that much, but there is something about those babies that I just can't resist!


The only problem with those is that they're so HUGE! But still so delicious. So when I saw a recipe for pumpkin scones on weelicious, I just had to make them. I made these as sort of "snack size scones" and reduced the size by about half, but if you would rather have bigger scones, go ahead and make 4 scones instead of 8, or double the recipe for 8 large scones!


So whether you also love those big Starbucks pumpkin scones, or you just love pumpkin (or, you know...you just love scones...), give this recipe a try. They make a perfect fall snack!


Pumpkin Scones
Adapted from weelicious
Makes 16 small scones
  • 2 1/2 cups all purpose flour
  • 3 Tbsp. brown sugar
  • 1/2 Tbsp. baking powder
  • 1/4 tsp. salt
  • pinch ground nutmeg
  • 1/2 tsp. cinnamon
  • 1/2 cup cold unsalted butter, cut into cubes
  • 1/3 cup pumpkin puree
  • 1 egg, beaten
Preheat oven to 425 degrees.

In a large bowl, whisk the flour with the sugar, baking powder, salt, cinnamon and nutmeg. 

Using a pastry blender or two knives, cut the butter into the flour until it resembles coarse meal. Once butter is fully combined, add in the pumpkin and the egg. Gently mix until combined. Mixture may be dry, so feel free to use your hands near the end. 

Dump the dough onto a floured cutting board and knead a few times. Place dough on parchment, and roll out dough into a 1-inch circle. Cut into 8 wedges and place parchment on a baking sheet. Bake in preheated oven for 25 minutes or until golden brown.


Monday, November 5, 2012

Pumpkin Cupcakes with Cream Cheese Frosting

Is your house overflowing with candy left over from Hallowe'en? Well, mine is...sort of. We have a little bit left that didn't get handed out...and then my sister has a whole load of it in her room. The problem is that, in order to eat her candy, I have to be verrrry sneaky.


A few days after Hallowe'en, I decided to make these cupcakes. We had some leftover pumpkin in the fridge because it seems that I have been on a pumpkin baking spree (and pumpkin only comes in like, GIANT cans...what's with that?) and I wanted to use it up. Well, I'm glad I made them because they were delicious!

They have that perfect blend of fall spices that you always expect when you eat something pumpkin flavoured, and they make a perfect treat for a chilly autumn afternoon.


Pumpkin Cupcakes with Cream Cheese Frosting
Adapted from Brown Eyed Baker
Makes 16 cupcakes

For the cupcakes:

  • 2 cups cake flour
  • 1/2 tsp. baking soda
  • heaping 1/2 Tbsp. baking powder
  • 1/2 tsp. salt
  • 1 tsp. cinnamon
  • 1/2 tsp. nutmeg
  • pinch of cloves
  • 1/2 cup butter, softened
  • 1 1/4 cup brown sugar
  • 2 eggs
  • 1/2 cup buttermilk
  • 3/4 cup canned pumpkin
For the frosting:
  • 3 oz. cream cheese, softened
  • 1/3 cup cool whip
  • 1/2 cup butter, softened
  • 2 cups icing sugar, sifted
  • 1/2 tsp. vanilla extract
Preheat oven to 350 degrees.

Combine the cake flour with the baking powder, baking soda, salt, cinnamon, nutmeg and cloves. Set aside.

In a large bowl, beat the butter with the brown sugar. Once mixed, beat in the eggs, one at a time. 

Add the flour to the butter mixture in 3 additions, alternating with buttermilk and ending with flour. Once combined, add pumpkin.

Pour into lined muffin tins. Bake for 17-20 minutes, or until a toothpick comes out clean. Cool completely before frosting.

While cupcakes are cooling, make the frosting. In a large bowl, beat together the butter and cream cheese. Beat in cool whip and vanilla. Sift in icing sugar, and beat until fully incorporated. Pipe or spread onto cooled cupcakes.

Sunday, October 28, 2012

Double Baked Potatoes

As the weather gets cooler and the nights get darker, I find that I just want comfort food. Pasta, chicken pot pie...and these potatoes!


What makes these different than regular potatoes is that they are scooped out after they are baked the first time, and the flesh is basically mashed into mashed potatoes...then you stuff the filling back into the empty potato skin! Oh, and then top them with bacon and cheese. How much more comforting can you get?


When I was taking the pictures for this post, my sister suggested that I should name them "Double Bacon Potatoes". "Double Bake-on Potatoes, get it?! Because they are double baked and they have bacon!" she said. Cute...but I thought it would confuse people. There is only one type of bacon. I'm sorry. 


Whatever you choose to call these baked potatoes, one thing that I know you'll call them is delicious.

Double Baked Potatoes
Makes 4 servings
  • 2 large baking potatoes
  • 1/3 cup sour cream (I used low fat)
  • 2 Tbsp. cream cheese
  • 1/4 cup milk
  • 1/4 tsp. onion salt
  • 1/4 tsp. black pepper
  • 4 slices bacon, cooked (substitute bacon bits if you want)
  • 1/2 cup shredded cheddar cheese
In an oven heated to 450 degrees, pierce potatoes and bake for one hour. Remove from oven and let cool.

Once potatoes are cool, cut in half and scoop out the flesh, being careful not to scoop all the way through, otherwise you may break the skin.

Put potato flesh into a large bowl and mash. Add sour cream, cream cheese, milk, onion salt and pepper. Spoon mixture back into empty potato skins and top with bacon and cheddar cheese.

Return potatoes to oven for 15 minutes.


Wednesday, October 24, 2012

Jack-O-Lantern Quesadilla

Can you believe that Hallowe'en is almost here? I can't! It seems like October has flown by. It won't be long before my house is filled with fun-sized chocolate bars...one of the great things about having a little sister is being able to steal her Hallowe'en candy!

In preparation for Hallowe'en, I've wanted to make a few "spooky" recipes. There are so many great Hallowe'en recipes out there (just check out my Pinterest board!) and they're so easy to make!


This past weekend, I made these Jack-O-Lantern Quesadillas. They're so adorable, and kids will love them (I know my sister did!). I made these with just cheese, but feel free to add whatever other fillings you like! Black beans would be good - they would take the Hallowe'en theme to the next level by making them black and orange!

These quesadillas would make a perfect Hallowe'en lunch or pre-trick-or-treating dinner. Whenever you choose to make them, they will be enjoyed by everyone!


Jack-O-Lantern Quesadillas
Makes one single-serving quesadilla

  • 2 small tortillas (I used whole-wheat, but use whatever you have on hand)
  • 1/3 cup shredded cheddar cheese
  • additional fillings of your choice
Preheat broiler.

Using a sharp knife, shape the top of the tortillas into a "stem" shape for the pumpkin.

On one of the tortillas, cup out a jack-o-lantern face. You can make it spooky, silly, happy...whatever you like!

Sprinkle the cheese over the uncut tortilla, and place the "face tortilla" over top. Put quesadilla on a foil-lined baking sheet and place under broiler for 4-6 minutes, until cheese is melted.


Sunday, October 21, 2012

Pumpkin Granola

Lately, my family seems to always have granola in the house. Ever since I first made Fruit & Nut Granola, I've made a batch of it almost every weekend! It really is good, and it's fun to switch up the add-ins with every batch I make. This week, I decided to switch it up even more and make pumpkin granola!


It seems like there are SO many pumpkin recipes popping up on the internet these days, and I'm not complaining! I love pumpkin...it's definitely one of the fall flavours I look forward to most. Pumpkin pie, pumpkin bread...why not pumpkin granola!


Another thing that's great about this granola is that it's a bit healthier than your regular granola because there's no oil. The pumpkin puree acts as a binder, so you don't really need it. Which is good...because a healthy breakfast means that you can eat more of that fall comfort food we all love. It all evens out.


Pumpkin Granola
Adapted from Two Peas and Their Pod
  • 5 cups rolled oats
  • 1 1/2 tsp. ground cinnamon
  • 1/2 tsp. ground nutmeg
  • 1/4 tsp. ground ginger
  • 1/8 tsp. ground cloves
  • 1/2 tsp. salt
  • 2/3 cup chopped pecans
  • 2/3 cup packed brown sugar
  • 1/2 cup pumpkin puree
  • 1/4 cup unsweetened apple sauce
  • 1/4 cup honey
  • 1 tsp. vanilla 
  • 1/3 cup each dried cranberries and raisins
Preheat oven to 325 degrees.

In a large bowl, combine oats, cinnamon, nutmeg, ginger, cloves, salt and pecans. Stir to combine and set aside.

In a separate bowl, combine pumpkin, brown sugar, applesauce, honey and vanilla. Mix well, then pour into bowl with oats. Stir until all of oat mixture is coated, then pour onto two baking sheets lined with parchment. 

Bake in preheated oven for 20 minutes, then stir and bake another 20 minutes. 

Enjoy the granola...and the amazing smell that will fill your house!

Monday, October 15, 2012

What's in My Lunch Box?

Wow, it feels like I haven't posted something new in forever! I've been busy lately, and haven't actually cooked a whole lot. I made a few things, though, so you'll be seeing those up here shortly! With the fall weather now in full swing, I've been making more fall-ish recipes (if that gives you any kind of a hint!).

These are a few lunches that I packed last week:


First up, an after Thanksgiving lunch with a leftover Rosemary Clover Roll, crackers, tortellini with pesto and parmesan, raspberries, apricots, teddy crackers and an oatmeal chocolate chip cookie.


And in this lunch box, a waffled bacon and cheese panini, carrots, kiwi, strawberries, crackers and a Moosewood Brownie.


Sunday, October 7, 2012

Making Pie: A Step-By-Step Tutorial

A few weeks ago, I posted a recipe for pie crust. When I posted it, it was the first time I had ever made pie from scratch. Since then, I've made several more pies, and I've discovered a few tricks and tips that help make a perfect pie every time. At first I thought of just editing my original post, but then I changed my mind and decided to make a tutorial instead. So, without further ado, let's get started.

Begin by making pie dough. I like to use this recipe, but feel free to use whatever recipe you like. When making the dough, here are some helpful hints:

  • Make sure the shortening (or butter, if that's what your recipe calls for) is fully chilled. This can be tricky with shortening, because when you get it at the grocery store, its room temperature. You can quickly chill it by sticking it in the freezer. Just don't forget about it!
  • Use cold water when preparing the dough. This is so the fat doesn't melt. You need those chunks of shortening/butter to make the pie crust flaky! I usually just get a glass of ice water, then use what I need. 
  • Chill the dough! The first time I made pie, I chilled it for 30 minutes. It got cold enough, but after a short amount of time it got really sticky and difficult to work with. Now I like to chill the dough for at least and hour and a half. This is easy if you plan ahead! Just make the dough in the morning and pull it out when you're ready to make the pie. That way, the dough is easy to work with.
Okay. Now, after all of that text, time for pictures!

Once the dough is made, roll it into two balls (top and bottom), flatten into discs and throw 'em in the fridge.


Once the dough has chilled for at least 90 minutes, take out disc at a time so the other doesn't get too warm. Now here comes my favourite new trick! Unwrap the dough and place it on a long sheet of plastic wrap, then place another sheet on top and start rolling.


I actually love this trick so much. For one, you have no messy flour-covered surface to clean up, and two, the dough doesn't stick, so once it's rolled out, it's easy to get off the counter and into the pie plate! I take the top layer of plastic off, then flip it, dough side down, into the pie plate. Then I peel off the top layer of plastic because nobody wants that in their pie.


Next, do the same thing with the other half of your dough. Once it's rolled out, put your filling into the prepared pie plate, then top it with the other half. If you want a full crust on the top, just roll the dough as you did with the first half, and flip it the same way.


If you want a lattice pie crust, roll the dough and cut it into eight equal strips. I don't really know how to explain how you weave the lattice, so check out the great step-by-step pictures over on Brown Eyed Baker.


Next, you're going to brush the top of the pie with one beaten egg, then sprinkle the crust with sugar.


Then, pop the pie in the oven according to the recipe's directions, and when you take it out, you will have a beautiful pie!


It looks almost too good to eat...almost.

Friday, October 5, 2012

What's in My Lunchbox?

From reading the "stats" of my blog, I know that I have a wide variety of readers from all over the world...everywhere from Russia to Japan to right here in Canada. To all my Canadian readers, are you super excited for Thanksgiving this weekend? I know I am! I can't wait to cook up a storm in the kitchen with my family...and then enjoy what we made!

I hope that you all have a fabulous Thanksgiving, and without further adieu, here are a couple of lunches from this week:


This was mine - a swiss cheese and veggie sandwich on whole wheat bread, some snap peas, grapes, trail mix and a little pumpkin candy for dessert!


In Liv's planetbox, there was some leftover baked macaroni and cheese, carrots, Gala apple slices, cheerios and a Moosewood brownie.

That's all for now - come back next week and hopefully you'll see some Thanksgiving leftovers in these lunch boxes!

Wednesday, October 3, 2012

Moosewood Brownies

Last summer, my family took a road trip to NYC. It was a great vacation, and we had lots of fun. The city was fantastic, but we also had lots of fun on the places we stopped along the way. One of those places was Ithaca, New York. It is well-known for Cornell University, but also for one of the most famous vegetarian restaurants, The Moosewood Restaurant. We ate there on our one night in Ithaca, and it was a really fun experience. The menu changes nightly, so you never know what you're going to get!

One thing on the menu that doesn't change, though, is the Moosewood Brownie. Since the menu at the Moosewood is pretty healthy, you feel like you can indulge in dessert. Two of us ordered them, and they were so good, we wished we had all ordered one! On our way out, we purchased a copy of The Moosewood Cookbook, and luckily, the brownie recipe was in it!


These brownies are dense, fudgey and super delicious! They're also made with brown sugar, which is something I;ve never seen in a brownie recipe before. Maybe that's the secret to making them so scrumptious...


Moosewood Brownies
Makes 16 brownies
From The Moosewood Cookbook

  • 3 oz. (3 squares) unsweetened baking chocolate
  • 1/2 cup butter
  • 1 cup brown sugar
  • 2 eggs
  • 1/2 tsp. vanilla
  • 1/2 cup all purpose flour
Preheat oven to 350 degrees.

In a medium saucepan, melt the butter and chocolate, stirring until combined and smooth. Remove from heat and stir in sugar and vanilla.

Crack eggs one at a time straight into saucepan, beating after each addition until fully incorporated. Stir in the flour and continue mixing until smooth.

Pour batter into a greased 8 x 8-in. pan. Bake in preheated oven for 20 minutes.

Monday, October 1, 2012

Zebra Cupcakes

As I mentioned in this post, a week ago was my sister's birthday. So even though we had cake on her real birthday in addition to the amazing cake she helped me bake for her party, she wanted to bring in cupcakes to school to share with her class. Well, anyone who knows my sister at all knows that she is obsessed with zebras (did you notice the purple zebra ribbon tied around the kit kat cake?). It all started when she was three and saw the movie Racing Stripes. It's actually a pretty funny movie, but after you've been forced to watch it dozens of times, the humour wears off. So, when I saw a recipe for zebra cake, I knew that I would have to make it some time. Instead of a whole cake, though, I adapted it to cupcakes!


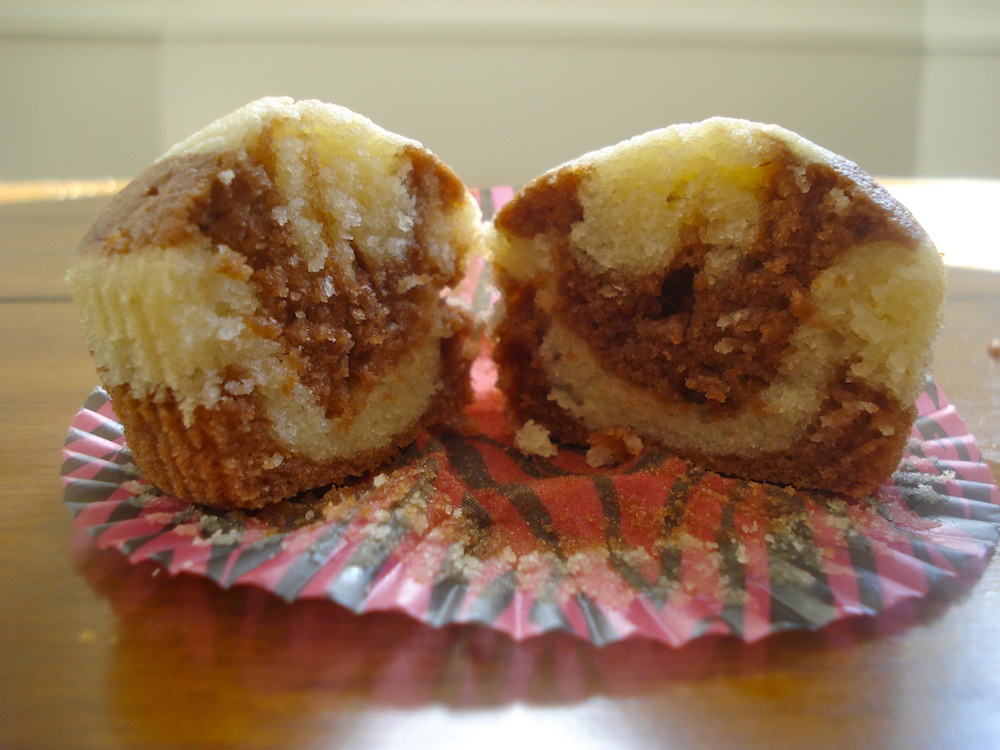
Okay, in that picture, they remind me more of cows than zebras...but wait until you see the inside! These were a hit with Liv's class, but really, how many ten-year-olds aren't going to appreciate a cupcake? Especially during school! 


These yummy cupcakes are like a cousin of marble cake, but the layers are just arranged differently. 


Look how cute they are! When you make the 9-inch round cake recipe, you can definitely get more layers in, and it looks even more zebra-ish, but I think these cupcakes still look really good! They're great for the zebra fanatic in your family, or just as a fun treat!


Zebra Cupcakes
Adapted from Yummy Odds
Makes 24 cupcakes
  • 2 cups all purpose flour
  • 2 tsp. baking powder
  • 1/2 tsp. salt
  • 1 cup granulated sugar
  • 4 eggs
  • 1 cup vegetable oil
  • 1 cup buttermilk
  • 2 tsp. vanilla extract
  • 2 oz. baking chocolate, melted
Preheat oven to 350 degrees. Line 24 muffin cups with liners.

In a medium bowl, combine flour, baking powder and salt.

In a large bowl, beat eggs with sugar, vegetable oil, buttermilk and vanilla. Pour in flour mixture and stir until just combined.

Remove two cups of batter and place in separate bowl. Stir chocolate into this batter, leaving the remaining batter plain.

To make zebra effect, spoon a bit of chocolate into a muffin cup, then add some vanilla over top. It showuld look like a "bull's eye". Continue layering until cupcake liner is 3/4 full (for an example, look here).

Bake for 15 minutes, until toothpick comes out clean.

Once cupcakes are cool, frost with your favourite frosting recipe. I used the recipe seen here.


Free Blog Template by June Lily