Tuesday, July 31, 2012

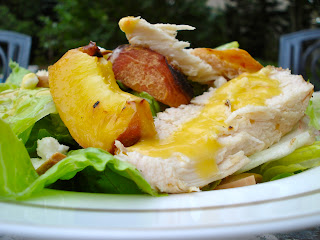
Grilled Peach Salad

Sooo...I'm kind of cheating you with this recipe today.


You might remember when I posted this recipe for strawberry feta salad a while back. Well, this is just a twist on that recipe. But remember how much I raved about that dressing? This one is just as good. You're going to love it. It's the perfect recipe for summer. 


I love peaches on the grill, and the dressing pairs perfectly with the salad because it has peach puree mixed right in. You don't even have to turn on your oven (well, okay, I guess the almonds are toasted, but you could do that ahead of time...or skip it all together), and it doesn't take too long to make. If you're looking for a great new salad, give this one a try, you won't be disappointed!


Grilled Peach and Chicken Salad
Adapted from this salad
Serves 4


For the salad:
  • 2 boneless, skinless chicken breasts
  • 4 cups lettuce (I used romaine)
  • 4 medium peaches
  • 1/2 cup toasted almonds
  • 3/4 cup crumbled feta
For the Dressing:
  • 1/3 cup olive oil
  • 1/3 cup diced peaches
  • 2 Tbsp. white wine vinegar
  • 2 tsp. honey
  • 1/4 tsp. salt
In a blender or food processor, whirl olive oil, peaches, vinegar, honey and salt until fully pureed.

Preheat BBQ to medium. Brush chicken with a little bit of the dressing, then season with salt and pepper. Grill chicken for 8 minutes, then flip and grill for another 8-10 minutes. Remove and let rest five minutes, then slice.

Divide lettuce among four plates and top with peaches, feta, almonds and chicken. Drizzle with dressing and serve.


Foodie Penpals Reveal Day!

Wow, I can't believe July is already over! I think my trip to France really made the month fly by. This month, I participated in my first ever Foodie Penpals. Have you heard of it? Basically, it's a program run by Lindsay at The Lean Green Bean. You send a "foodie" package to someone, and someone else sends one to you. If you want to find out more, click the button below:

The Lean Green Bean

I had a lot of fun with foodie penpals this month. I sent my package to Rebecca at Crunchy Can Feel Good. Head over to her blog if you want to check out what I sent!

I received my package from Alison. She's so nice, and her blog is super fun to read. She posts about lots of things, from her favourite recipes to the (many!) places in the world where she's travelled. She sent me a fantastic package, and now I'm very excited to share it with you!


When the package got here, I couldn't wait to rip into it! Sitting on top was a nice little letter that Alison wrote explaining about what she put in my package. She went shopping at a European supermarket near her because of my recent trip to France.


Here's a look at everything all together. 


First up are these rice chips. I'd never heard of tamari before, but my family loves rice chips so these were a perfect choice!


This is a package of instant oatmeal (European style - but I can't quite tell what language...). I haven't tried this one yet, but it will be perfect for one of those busy mornings once school starts again.


This one is a pear and balsamic jam/chutney. I love the combination of fruit with meat, so I can't wait to try this on lots of different things. We put it on our turkey-feta burgers, and it was great!


Next up, this yummy nut bar. Granola bars are one of my favourite snacks, so this one was a perfect choice for me. It almost tastes like pecan pie!


I haven't had a chance to try this one yet because it's been really warm here, but the honey-vanilla flavour sounds like it'll be yummy.


This star shaped pasta was so adorable! I wanted to dig in right when I opened my package, but I thought my little sister would really like this, so I waited. It's on the menu for dinner tonight with pesto and salmon.


See how cute they are?


This was another perfect choice for me because I love caramel. I actually saw these everywhere in France!


As much as I love caramel, I love chocolate even more, so this was another home run!

Thanks so much to Alison for sending me such a wonderful package! I had such a great time participating in Foodie Penpals this month, and I was lucky to get paired with such a great penpal!


Monday, July 30, 2012

Parmesan Garlic Pull-Apart Bread

I don't make a lot of yeast bread. When I do, it's usually on a day where I have nothing to do, what with all the rising and punching down and rising and...well, it's all just very time consuming.

When I do make bread, though, I like to make fun kinds, like cinnamon-raisin bread, or bagels. Or this lovely loaf of cheesy garlic pull-apart bread.


Variations of this recipe have been circling the internet for a while now (I can't wait to try the cinnamon sugar version!), and it looked like a fun recipe to try out. It looks tricky, but it's actually not hard at all! I made a half recipe in a mini loaf pan because we didn't need that much (and the mini loaf is really cute!), but it turns out great in a large loaf pan too.


Isn't it adorable? Also, it really reminds me of this, but maybe that's just me. I have pugs on the brain. What can I say, I'm obsessed. With both pugs and this bread.

Parmesan Garlic Pull-Apart Bread
Adapted from Pink Parsley
Makes one loaf
  • 3 cups all-purpose flour
  • 1 cup warm water
  • 1 pkg. instant dry yeast
  • 3 Tbsp. Sugar
  • 3/4 tsp. salt
  • 2 Tbsp. butter, melted
  • 2 cloves garlic
  • 1 cup parmesan cheese, grated
  • 1 tsp. dried basil, or an Italian herb blend
In a large bowl (or the bowl of a stand mixer), combine water, sugar and yeast. Let sit for a few minutes to let the yeast activate. Add the first two cups of flour, and mix to combine. Add the third cup of flour, a little bit at a time, until dough forms. Knead 5-10 minutes, until dough is easy to work with and doesn't stick to the bowl. Form the dough into a ball and put it in a lightly oiled bowl. Cover with a towel, and allow the dough to sit in a warm place for about an hour, or until doubled in size.

Punch dough down on a lightly floured surface, and let sit for 5 minutes. During this time, you can melt the butter and grate the cheese for the filling.

Roll dough into a 12 x 20 inch rectangle. Brush with the butter, then sprinkle with cheese, herbs, salt and garlic. Cut the dough into six equal strips (cut so the strips are 12 inches long, not 20), and stack the strips on top of each other. Next, cut the strips into 6 equal squares. 

Grease a 9 x 5 inch loaf pan well. Put the loaf pan on its small side so it is standing up, and stack the squares into pan, one on top of the other. Cover with a towel and let rise 30-45 minutes.

Bake for 35-45 minutes (until top is golden brown and bread is cooked through) in an oven heated to 350 degrees. Remove from oven and let cool at least 15 minutes before serving.


Thursday, July 26, 2012

Cheesy Corn Dip

Corn on the cob is a food that, in my mind, goes hand in hand with summer. I eat it a lot in the summer, and have since I was old enough to eat it off the cob. For this dip, you shave the corn off of the cob, but it still has that fresh, summery flavour.


Shaving all that corn reminded me of the two long summers during which I had braces. For those of you who haven't had them, YOU CAN'T EAT CORN ON THE COB WITH BRACES. Those were hard days (okay, I'm a bit dramatic) as I watched my family eat corn while I sawed away at my cob with my butter knife, corn flying everywhere. 


Luckily, I can now eat corn again, and I thoroughly enjoy it every time I do. Like in this dip for instance. The corn in fresh and delicious, and covered in yummy cheddar cheese. I would recommend this dip to any other corn lover like me. Make this for yourself. Or, if you're nice, make it for somebody with braces. They will appreciate you for it. Trust me.


Cheesy Corn Dip
Adapted from How Sweet It Is and Emiril Lagasse
Makes one 8 x 8 dish of dip

  • 3 1/2 cups corn (I used fresh)
  • 2 Tbsp. butter
  • 1/2 tsp. salt
  • pinch red pepper flakes
  • 1 cup chopped yellow onion
  • 1/2 cup chopped purple onion
  • 1/2 cup chopped red bell pepper
  • 1 clove garlic
  • 1 cup shredded sharp cheddar cheese, divided
  • 1 cup shredded mild cheddar or Monterey Jack cheese, divided
  • 3/4 cup plain Greek Yogurt
Preheat oven to 350 degrees.

In a large skillet over medium-high heat, melt 1 Tbsp. butter and sauté corn with salt and red pepper flakes until corn is golden brown and caramelized, about 8 minutes.

Transfer corn to bowl, then melt the other Tbsp. of butter and sauté onions, red pepper and garlic until onion is translucent and veggies are wilted. Add this mixture to bowl with corn. Stir in Greek yogurt and half a cup of each cheese.

Pour into 8 x 8 in. baking dish and bake in preheated oven for 20-25 minutes. Serve warm with tortilla chips or raw veggies.


Lemon Poppyseed Loaf

Starbucks is a place that I visit a lot. I even have a gold customer loyalty card. When I go, I like so many of the drinks, but if I get food, I usually get either banana chocolate chip coffee cake or lemon poppyseed loaf. They're both super tasty (I recommend them!). Unfortunately, if you've ever looked at the nutritional information, you'll know that these are "special treat" kind of items, not to be eaten ALL the time. So, I decided to make my own!


This loaf is really good, and very lemon-y. It's different from the one at Starbucks, because it isn't topped with icing, but you could easily add some if you wanted. I think that it's delicious without it, and it makes it more of an afternoon snack than dessert. 


By the way, it's all wrapped up because it's my grandmother's favourite, and I gave it to her.

Lemon Poppyseed Loaf
makes one loaf
  • 1/2 cup butter, softened
  • 1 cup granulated sugar
  • 2 eggs
  • 1 1/2 cups flour
  • 3 Tbsp poppyseeds
  • 1 Tbsp grated lemon rind
  • 1 tsp. baking powder
  • 1/4 tsp. salt
  • 1/2 cup milk

  • 1/3 cup granulated sugar
  • 1 tsp. grated lemon rind
  • 1/3 cup lemon juice
In a large bowl, combine butter and sugar, beating until fluffy. Add the eggs one at a time, and beat until incorporated.

In a seperate bowl, whisk together flour, poppyseeds, lemon rind, baking powder and salt. Add to the butter mixture in three additions, alternating with milk, and beginning and ending with flour.

Pour into a greased 8 x 4 in. loaf pan, and bake in center of oven for one hour, or until a toothpick comes out clean. 

To make syrup, combine sugar, lemon rind and lemon juice in a sauce pan or a microwavable bowl, and heat until sugar is dissolved. 

When loaf is taken out of oven and still warm, poke in 12 places with a skewer. Pour syrup over top and let loaf rest before cutting.


Tuesday, July 24, 2012

Turkey-Feta Burgers

I love burgers. They're so delicious, and in the summer, we usually barbecue them at least once a week for dinner. Sometimes, though, a plain beef burger week after hot summer week can get a bit...old. To solve this problem, I decided to make turkey burgers!


Some people think that turkey is dry, and doesn't have any flavour, but after one taste of these burgers, they will be proven wrong! The feta cheese mixed in gives the burgers some moisture, and a great salty taste. I enjoyed these burgers as a change of pace from the regular old beef burgers, so much that I'll have to try some other variations soon!


Turkey-Feta Burgers
Makes 4-6 burgers

  • 1 lb. ground turkey
  • 3/4 cup crumbled feta cheese
  • 1 tsp. dried oregano
  • 3/4 cup panko breadcrumbs
Preheat BBQ to medium-high heat.

In a large bowl, combine turkey, oregano and breadcrumbs, and mix until combined. Add in the feta cheese, and mix gently (so that the cheese doesn't break into super tiny pieces).

Form into patties, and refrigerate for 10 minutes so burgers set a bit before they go on the grill.

Grill burgers until no longer pink in center, about 6-10 minutes a side.

Monday, July 23, 2012

Tex-Mex Quinoa Stuffed Peppers

Quinoa is one of my favorite foods to make. It's really versatile, plus it's super healthy! Until I made these peppers, though, I had only ever made quinoa as a side dish (as seen here). I realized when I made these that it also makes a perfect base for a main dish, especially a vegetarian one! Quinoa has lots of protein (8g in one cup cooked) and you can do so many things with it.


These bell peppers are stuffed with cooked quinoa, black beans and corn, then topped with cheese. They're a fantastic summer meal with fresh corn, but you could easily make them in the winter with frozen or canned corn too. Served with a side salad, they make a great meal to be eaten al fresco!


Tex-Mex Quinoa Stuffed Peppers
Adapted from I Wash...You Dry
Serves 3-6 (Some of us ate one half, others ate two)

  • 1 cup quinoa
  • 1 tsp. olive oil
  • 1 clove garlic, minced
  • 1 diced red onion
  • pinch of red pepper flakes
  • 3 bell peppers of any colour (I used red, orange and yellow)
  • 1 cup black beans, drained and rinsed
  • 1 cup corn
  • 1/4 tsp. salt
  • 1 1/2 cups shredded cheese (I used a tex-mex blend)
Slice peppers in half (from top to bottom) and scoop out seeds. Set aside.

In a saucepan, heat oil and sauté garlic, onion and red pepper flakes until onion is translucent. Rinse quinoa and place in saucepan with 2 cups of water (or broth, if you prefer). Bring to a boil, then cover and reduce heat to simmer until all liquid is absorbed (about 12-15 minutes). 

Heat oven to 350.

Add beans, corn and salt to cooked quinoa and stil to combine. Spoon mixture into hollowed peppers. Top with cheese and place on baking sheet lined with foil. Bake in preheated oven for 20 minutes.

Serve with salsa and/or guacamole. 


Thursday, July 19, 2012

Honey-Lime Tilapia with Mango-Pineapple Salsa

I used to hate fish. With a passion. When I was four, I said, and I quote, "This tastes like grass" (whatever that means?). My mom isn't a huge fan either. A few years ago though, we started to eat salmon more and more, and now it's actually one of my favorite dinners! I even order it at restaurants!

The next fish I've moved on to is tilapia, and I think it is going to take less time than salmon! It doesn't taste that "fishy", and it's actually really good (and healthy too!).

This tilapia is really tasty. It is marinated in lime juice and honey, and topped with a yummy pineapple-mango salsa. I've recently started to LOVE mango. They're just so good, and fantastic in this salsa.


If you're like me and you're trying to introduce more fish into your diet, try this tilapia recipe. You won't be disappointed!

Honey-Lime Tilapia with Mango-Pineapple Salsa
Salsa adapted from Eat Drink Love
Serves 4


For the fish:

  • 4 tilapia fillets (about 100g, or 3.5 oz. each)
  • 1 Tbsp. honey
  • 1 Tbsp. lime juice
  • 1 Tbsp. olive oil
For the salsa:

  • 1 1/2 cups diced mango
  • 1 1/2 cups diced pineapple
  • 1/4 cup diced red onion
  • 1 Tbsp. lime juice
In a shallow dish (I used an 8 x 8 square baking dish), combine all marinade. Add fish, and flip to coat both sides. Marinade for 1 to 24 hours. 

Once marinated, wrap each filet in foil and BBQ for 12 minutes, or bake for 12-15. While fish is cooking, prepare salsa. 

Serve salsa with fish. 

I had this with basmati rice and asparagus.

Wednesday, July 18, 2012

Chocolate Marshmallow Cookies

There are times when you just get stuck in a cookie rut. You know, when you just make chocolate chip cookies over and over again? Well, chocolate chip cookies are my favorite, but sometimes you need to shake things up a bit. That's why I decided to make these cookies!


When I made s'mores pie, the only bag of marshmallows I could find was huuuge, so I bought it but I ended up with a lot left. Enter, chocolate marshmallow cookies!

Unlike yesterday's recipe, this recipe is much more summery. It tastes a lot like s'mores, minus the graham crackers. They're so chocolatey, and you won't be able to resist!


Chocolate Marshmallow Cookies
Makes 24 cookies
Adapted from Two Peas and Their Pod
  • 1 1/4 cups all purpose flour
  • 1/2 tsp. baking soda
  • pinch of salt
  • heaping 1/3 cup of cocoa
  • 1/2 cup unsalted butter
  • 1/2 cup white sugar
  • 1/2 cup brown sugar
  • 1 egg
  • 1 tsp. vanilla
  • 1/2 cup chocolate chips
  • 1/2 cup mini marshmallows
Preheat oven to 350 degrees.

In a medium bowl, combine flour, baking soda, salt and cocoa. Set aside.

In a large bowl, cream butter, sugars, egg and vanilla. 

Slowly incorporate flour mixture into butter mixture. Mix until thoroughly combined, then fold in chocolate chips.

Form cookies into balls, then add about 3 marshmallows to each.

Bake in preheated oven on well-greased (marshmallows stick!) cookie sheets for 8-10 minutes.

Monday, July 16, 2012

Baked Macaroni & Cheese

I know what you're thinking. Mac and cheese? In the summer?! Well, I made this recipe for my little sister. She left for camp on Sunday, and we asked her what she wanted Saturday night as her last home cooked dinner before camp, and she said "That macaroni that you put in the oven." Last year she said pancakes. Go figure.


I didn't protest, though! I love macaroni and cheese. It tastes good any time of year. I've tried a few different macaroni recipes, and this one is definitely one of the best ones. I used panko bread crumbs instead of the regular kind, and it made a big difference! They got so crispy on the top of the macaroni...yum!


Baked Macaroni & Cheese
Adapted from Kirbie's Cravings
Serves 6
  • 2 cups uncooked elbow macaroni
  • 2 1/2 cups milk (I used skim...because that makes it healthy, right?)
  • 1 Tbsp. dijon mustard
  • 1 tsp. salt
  • 2 Tbsp. butter
  • 1/4 cup flour
  • 2 cups sharp cheddar cheese
  • 1/2 cup panko breadcrumbs
Preheat broiler to high.

Bring a large pot of water to a boil, and cook macaroni according to package directions, about 8 minutes.

Meanwhile, whisk together milk, Dijon mustard and salt. In a large saucepan over medium heat, melt butter. Once fully melted, whisk in flour. Let cook a few minutes, then slowly incorporate milk. Whisk constantly, until mixture comes to a boil and becomes thickened. Remove from heat, and stir in 1 1/2 cups of cheese.

Once pasta is cooked, drain (don't rinse) and add to sauce. Stir to coat, then pour into an 8 x 8 inch pan.  Sprinkle with remaining 1/2 cup of cheese, then top with breadcrumbs. Put under broiler until cheese melts, about 5 minutes.


Fruit & Nut Granola

I really like granola. I like it in both cereal AND bar form. Yum. I especially like this granola. It's got really summer-y flavours because it has dried cherries and blueberries in it, as well as pecans, walnuts and almonds. It's the perfect summer breakfast for people who like oatmeal in the winter, but want something cold in the summer.


When I adapted this from the original recipe, it made so much. As in, I didn't have a bowl big enough to mix it in. My neighbours now also have a lot of granola.


Well, now this granola is sitting in a big tupperware in my cupboard and tempting me every time I walk in the kitchen. Also, I'm pretty sure my dad has had upwards of three bowls today. Not even joking.


Fruit & Nut Granola
Adapted from allrecipes
  • 1/4 cup canola oil
  • 3 Tbsp. hot water
  • 1/3 cup honey
  • 3 cups rolled oats
  • 1/3 cup sliced almonds
  • 1/3 cup chopped walnuts
  • 1/3 cup chopped pecans
  • 3/4 cup raisins
  • 1/2 cup mixed dried fruit (I used dried cherries, blueberries and cranberries)
  • 1/4 cup sunflower seeds
Preheat oven to 350 degrees. 

In a medium bowl, combine oil, hot water and honey. Whisk until combined.

In a separate large bowl, mix the oats, nuts and sunflower seeds. Pour the honey mixture over top. Mix until all of the mixture is fully coated.

Spread the granola over a baking sheet lined with aluminum foil and bake for ten minutes, then stir, and bake for another ten minutes, until granola is golden.

Add dried fruit, then let granola cool completely (granola will harden more as it cools), the store in airtight containers.

Wednesday, July 11, 2012

What I Ate Wednesday: Paris Edition!

Bonjour from Paris! I've been here for the last five days, and tomorrow I leave for home.

This is the first time I've done a WIAW post, and I'm excited that I get to share what I've been eating here in France. I've been eating mainly French things (like croissants, pain au chocolat and jambon et fromage sandwiches on baguette), and they have been so tasty!

Many "What I Ate Wednesday" posts are not actually from this Wednesday, but because of the time difference here in France, this post is entirely what I ate today! So here we go!


Breakfast was from the most gorgeous Starbucks I have ever seen. It has really high ceilings (complete with chandeliers), and the building seems to go on forever!


After days of croissants and bread, I was craving some fruits and veggies. For breakfast, I had a huge fruit cup and a fruit & nut granola bar. One thing I found really funny was that the Starbucks' here serve pancakes and French toast (which, no, they don't just call "toast").


After a morning of touring and shopping, we ate lunch at the top of a big department store. The restaurant was called "Deli-cieux", which was a bit of a play on words, because "delicieux" means delicious, but with the hyphen, it meant "Deli of the Skies", which it really was! It was nine floors up, and we got a gorgeous view of all of Paris.


My lunch was a salad with mozzerella, parmesan, tomatoes and olives (which I picked around). I also had a peach iced tea, which I've been having at lunch every day. They don't seem to have plain iced tea here, but that's fine by me because it's so good with the peach flavor in it!

For dinner, I had the best duck I've ever tasted! It was served with fig sauce and mashed potatoes, and it was SO good!


For dessert, I had molten chocolate cake with pistachio ice cream. Again, SO good! I think this was the best dinner I had while in Paris.


Overall, Paris was great, and this dinner was a great way to finish a fantastic trip!

Tuesday, July 3, 2012

The Food of France: Part One

My posts are going to be a little on and off over the next couple of weeks - because I'm on vacation in France! This week, my family is staying in a villa in the south of France, then next week we're off to Paris!

I'm going to try to post some of the food I'm eating here, and today I'm going to start with the delicious French macarons that I had yesterday.


These are the more traditional French macaron, the ones that you've probably seen in stores (I've even heard that they're being called "the new cupcake"). They're very cute and colourful, and they come in lots of flavours (the ones above are chocolate, pistachio and lemon...yum!). 


The other type of macarons that I bought were the St. Emilion kind. I had never seen these before, but I liked them even better than the other ones! These are only made in St. Emilion, which is a town in France that we visited, and it's beautiful. It has lots of old architecture, and cobblestone streets. 


These are little cookies made from just almonds, sugar and egg whites. They are so good! The recipe dates back to the 1600s! Yum! I definitely recommend trying them.


Free Blog Template by June Lily